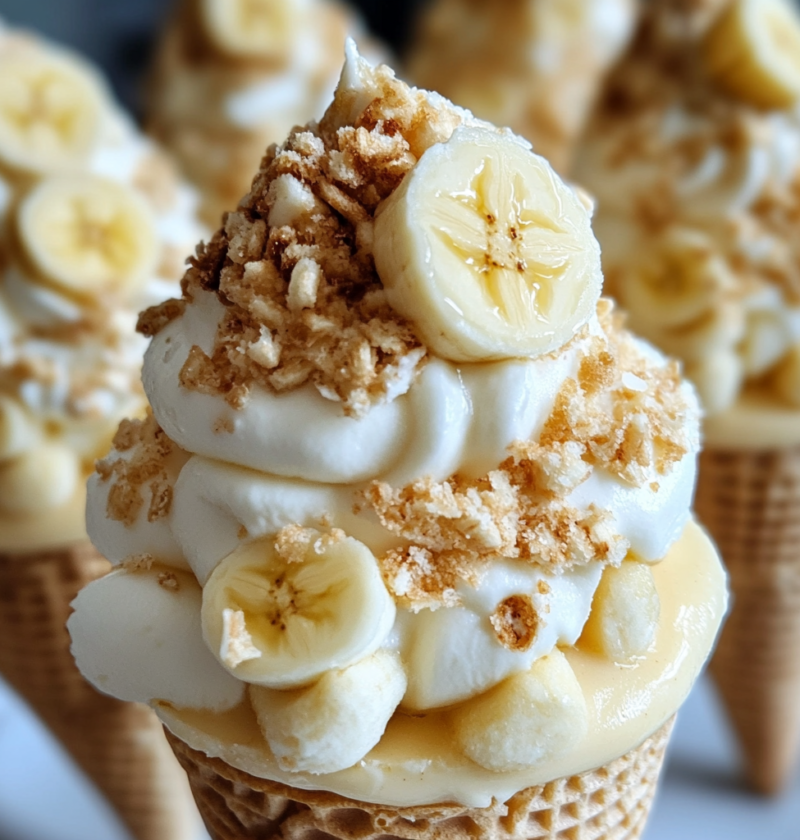
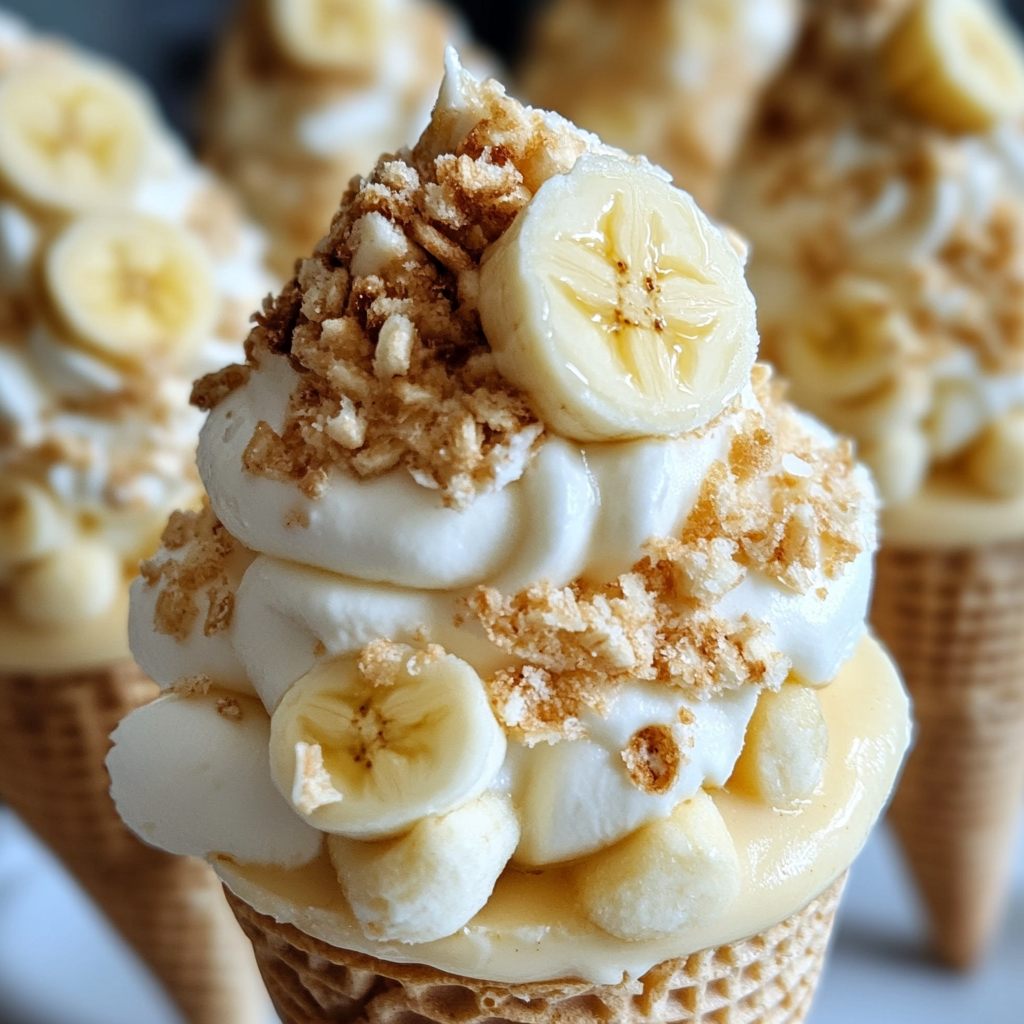
Banana Pudding Cheesecake Cones
Introduction
Indulge in the creamy and delightful combination of banana pudding and cheesecake with these irresistible Banana Pudding Cheesecake Cones. This unique dessert takes the classic flavors of banana pudding and transforms them into a portable and fun treat. Whether you’re hosting a party or simply craving a sweet indulgence, these cheesecake cones are sure to impress.
Imagine biting into a crispy sugar cone filled with a creamy cheesecake mixture infused with banana flavor. Each bite is a perfect balance of sweetness and tanginess, creating a delightful explosion of flavors in your mouth. The combination of the smooth cheesecake filling and the crunchy cone creates a textural contrast that will keep you coming back for more.
As you savor each bite, you’ll be transported back to childhood memories of enjoying banana pudding. This recipe pays homage to that classic dessert while adding a modern twist. It’s a dessert that brings together nostalgia and innovation, making it a true crowd-pleaser.
Why You’ll Love This Recipe
There are countless reasons why you’ll fall in love with these Banana Pudding Cheesecake Cones:
1. Easy and Quick
This recipe requires minimal effort and time, making it perfect for busy days or last-minute dessert cravings. With just a few simple steps, you’ll have a delectable treat ready to enjoy.
2. Creamy and Fluffy
The cheesecake filling is light, creamy, and fluffy, creating a heavenly texture that melts in your mouth. Each bite is like a cloud of deliciousness that will leave you wanting more.
3. Homemade Goodness
By making these Banana Pudding Cheesecake Cones from scratch, you have control over the quality and freshness of the ingredients. It’s a homemade dessert that tastes even better than store-bought alternatives.
4. Versatile and Adaptable
This recipe allows for endless possibilities when it comes to customization. You can add your favorite toppings, such as chocolate shavings or caramel sauce, to elevate the flavors even further. Additionally, you can experiment with different types of cones or even serve the cheesecake mixture in cups for a different presentation.
Ingredients
For the Banana Pudding Cheesecake Cones, you will need the following ingredients:
For the Cheesecake Filling:
- 1 ½ cups cream cheese, softened
- 1 cup granulated sugar
- 1 teaspoon vanilla extract
- 2 ripe bananas, mashed
- 1 cup heavy cream
- 1 tablespoon lemon juice
- 1 tablespoon cornstarch
For the Cones:
- 12 sugar cones
- 1 cup crushed vanilla wafers
Step-by-Step Instructions
Follow these simple steps to create your delicious Banana Pudding Cheesecake Cones:
Step 1: Prepare the Cheesecake Filling
- In a mixing bowl, beat the cream cheese and sugar until smooth and creamy.
- Add the vanilla extract, mashed bananas, heavy cream, lemon juice, and cornstarch. Mix well until fully combined.
Step 2: Assemble the Cones
- Place a tablespoon of crushed vanilla wafers at the bottom of each sugar cone.
- Spoon the cheesecake filling into each cone, filling them to the top.
- Top each cone with an additional sprinkle of crushed vanilla wafers for added texture.
Step 3: Chill and Serve
- Place the filled cones in the refrigerator and let them chill for at least 2 hours to allow the flavors to meld together.
- Once chilled, serve the Banana Pudding Cheesecake Cones and enjoy!
Cooking Tip: For extra convenience, you can prepare the cheesecake filling ahead of time and assemble the cones just before serving to ensure maximum crispiness.
Expert Tips for Success
Here are some expert tips to help you achieve the best results with your Banana Pudding Cheesecake Cones:
1. Soften the Cream Cheese
Make sure to soften the cream cheese at room temperature before using it. Softening the cream cheese ensures a smooth and creamy texture in the filling.
2. Use Ripe Bananas
Choose ripe bananas with brown speckles for the best flavor. Ripe bananas are sweeter and have a stronger banana taste, enhancing the overall flavor of the cheesecake filling.
3. Chill the Cones
Chilling the filled cones for at least 2 hours allows the flavors to meld together and the filling to set properly. This step ensures a delicious and cohesive dessert experience.
4. Get Creative with Toppings
Feel free to get creative with toppings to add extra flavor and visual appeal. Consider drizzling melted chocolate, sprinkling chopped nuts, or adding a dollop of whipped cream on top of each cone.
Variations and Substitutions
While the classic Banana Pudding Cheesecake Cones are already delightful, you can customize them to suit your preferences:
1. Chocolate Lovers
If you’re a chocolate lover, you can add a chocolate twist to this recipe. Mix in some cocoa powder to the cheesecake filling for a rich chocolate flavor. You can also garnish the cones with chocolate shavings or a drizzle of chocolate sauce.
2. Gluten-Free Option
If you follow a gluten-free diet, you can substitute the crushed vanilla wafers with gluten-free graham cracker crumbs. Ensure that all other ingredients used are also gluten-free.
3. Vegan Variation
For a vegan version of this recipe, you can replace the cream cheese with vegan cream cheese and the heavy cream with coconut cream or another dairy-free alternative. Adjust the sweetness and texture to your liking with vegan-friendly sweeteners and thickeners.
Serving Suggestions
To enhance your enjoyment of these Banana Pudding Cheesecake Cones, consider the following serving suggestions:
1. Garnish with Fresh Sliced Bananas:
Before serving, top each cone with a slice of fresh banana for an extra burst of banana flavor and a visually appealing touch.
2. Pair with a Scoop of Vanilla Ice Cream:
Serve the cheesecake cones alongside a scoop of creamy vanilla ice cream. The combination of warm cheesecake and cold ice cream creates a delightful temperature contrast.
3. Serve with a Drizzle of Caramel Sauce:
Elevate the flavors by drizzling a generous amount of caramel sauce over the cheesecake cones. The caramel adds a luscious sweetness that pairs perfectly with the banana and cheesecake flavors.
FAQs
Here are some common questions and answers about Banana Pudding Cheesecake Cones:
1. Can I Make the Cheesecake Filling in Advance?
Yes, you can prepare the cheesecake filling in advance and store it in an airtight container in the refrigerator for up to 24 hours. When ready to assemble the cones, give the filling a quick stir to ensure it’s well mixed before spooning it into the cones.
2. Can I Use Store-Bought Cones?
Absolutely! If you prefer convenience, you can use store-bought sugar cones instead of making your own. The filling will taste just as delicious.
3. How Long Do the Cheesecake Cones Last?
Once assembled, the Banana Pudding Cheesecake Cones are best enjoyed within 2-3 days. Store them in an airtight container in the refrigerator to maintain their freshness.
4. Can I Freeze the Cheesecake Cones?
While it’s possible to freeze the filled cones, the texture of the filling may change slightly upon thawing. For the best taste and texture, it’s recommended to enjoy them fresh.
Final Thoughts
Banana Pudding Cheesecake Cones are a delightful fusion of two beloved desserts. With their creamy cheesecake filling and crunchy sugar cones, they are a treat that will please both kids and adults alike. The flavors of banana pudding shine through in every bite, making these cones a truly memorable and indulgent dessert.
So why wait? Grab your ingredients and get ready to embark on a culinary adventure. The Banana Pudding Cheesecake Cones await, promising a burst of flavors and a joyful experience. Try this recipe and share your delightful creations with family and friends. It’s time to savor the magic of banana pudding in a whole new way!
Banana Pudding Cheesecake Cones
Indulge in the creamy and delightful combination of banana pudding and cheesecake with these irresistible Banana Pudding Cheesecake Cones. This unique dessert takes the classic flavors of banana pudding and transforms them into a portable and fun treat. Whether you’re hosting a party or simply craving a sweet indulgence, these cheesecake cones are sure to impress.
Ingredients
- 1 ½ cups cream cheese, softened
- 1 cup granulated sugar
- 1 teaspoon vanilla extract
- 2 ripe bananas, mashed
- 1 cup heavy cream
- 1 tablespoon lemon juice
- 1 tablespoon cornstarch
- 12 sugar cones
- 1 cup crushed vanilla wafers
Directions
-
In a mixing bowl, beat the cream cheese and sugar until smooth and creamy.
-
Add the vanilla extract, mashed bananas, heavy cream, lemon juice, and cornstarch. Mix well until fully combined.
-
Place a tablespoon of crushed vanilla wafers at the bottom of each sugar cone.
-
Spoon the cheesecake filling into each cone, filling them to the top.
-
Top each cone with an additional sprinkle of crushed vanilla wafers for added texture.
-
Place the filled cones in the refrigerator and let them chill for at least 2 hours to allow the flavors to meld together.
-
Once chilled, serve the Banana Pudding Cheesecake Cones and enjoy!