Introduction
Imagine biting into a chewy, nutty, and sweet dessert that instantly transports you to a state of pure bliss. That’s the magic of Pistachio Dream Cookie Bars! This recipe is not just a treat for your taste buds but a journey of flavors and textures that will leave you craving for more with each bite. Whether you’re a seasoned baker or a novice in the kitchen, these cookie bars are a delightful addition to any baking repertoire.
What makes this Pistachio Dream Cookie Bars recipe truly special is its harmonious blend of rich pistachios, creamy butter, and indulgent chocolate chips. Each bite offers a perfect balance of sweet and salty flavors, creating a symphony of taste that is simply irresistible. These bars are not only a delicious dessert but also a work of art that showcases the beauty of simple yet high-quality ingredients.
With roots that trace back to the Mediterranean region, pistachios have a long-standing cultural significance in many cuisines. These nuts are celebrated for their unique flavor profile and nutritional benefits, making them a popular choice for both sweet and savory dishes. By incorporating pistachios into these cookie bars, you’re not just adding a delightful crunch but also a touch of culinary heritage to your baking.
Join me on a culinary adventure as we explore the world of Pistachio Dream Cookie Bars—a recipe that embodies the essence of homemade goodness and culinary creativity. Get ready to indulge your senses and elevate your baking game with this irresistible treat!
Why You’ll Love This Recipe
These Pistachio Dream Cookie Bars are a true delight for anyone with a sweet tooth and a penchant for luxurious treats. Here’s why you’ll fall in love with this recipe:
The combination of pistachios, butter, and chocolate chips creates a heavenly flavor profile that is sure to satisfy your dessert cravings.
These cookie bars are incredibly easy to make, requiring minimal effort for a decadent end result that will impress your friends and family.
With pistachios being a good source of protein and healthy fats, these bars offer a guilt-free indulgence that you can enjoy without any reservations.
Whether you’re hosting a special occasion or simply craving a homemade treat, these Pistachio Dream Cookie Bars are the perfect choice for any sweet celebration.
Ingredients
Let’s gather all the ingredients you’ll need to create these irresistible Pistachio Dream Cookie Bars:
1. 1 cup shelled pistachios, chopped
2. 1 cup all-purpose flour
3. 1/2 cup unsalted butter, softened
4. 1/2 cup granulated sugar
5. 1/2 cup chocolate chips
6. 1 teaspoon vanilla extract
7. 1/2 teaspoon salt
8. Optional: 1/4 cup shredded coconut for added texture
Feel free to customize this recipe by substituting ingredients based on your preferences. For a healthier version, you can use whole wheat flour or coconut sugar as alternatives. Get creative with your choices and make these Pistachio Dream Cookie Bars your own!
Step-by-Step Instructions
Follow these simple steps to create your own batch of Pistachio Dream Cookie Bars:
1. Preheat your oven to 350°F (180°C) and line a baking dish with parchment paper.
2. In a mixing bowl, cream together the softened butter and sugar until light and fluffy.
3. Add the vanilla extract and salt to the butter mixture, and mix well.
4. Gradually incorporate the flour into the mixture until a dough forms.
5. Gently fold in the chopped pistachios, chocolate chips, and shredded coconut, if using.
6. Press the dough evenly into the prepared baking dish, smoothing the top with a spatula.
7. Bake the bars for 25-30 minutes or until the edges are golden brown.
8. Allow the bars to cool completely before slicing them into squares or rectangles.
Pro Tip: For an extra indulgent touch, drizzle melted chocolate over the cooled cookie bars before serving. This will add a decadent finish to your Pistachio Dream creation!
Expert Tips for Success
Here are some expert tips to ensure that your Pistachio Dream Cookie Bars turn out perfectly every time:
1. Use high-quality pistachios for the best flavor and texture in your bars.
2. Make sure your butter is softened but not melted to achieve the right consistency in the dough.
3. Don’t overmix the dough once the flour is added to prevent a tough texture in the bars.
4. Allow the bars to cool completely before cutting them to ensure clean slices without crumbling.
By following these tips, you’ll master the art of creating heavenly Pistachio Dream Cookie Bars that will wow your taste buds and impress your guests!
Variations and Substitutions
There are endless ways to customize this Pistachio Dream Cookie Bars recipe to suit your preferences and dietary needs:
1. For a gluten-free version, use almond flour or a gluten-free flour blend in place of all-purpose flour.
2. Swap the chocolate chips for white chocolate chunks or dried fruit for a fruity twist.
3. Add a sprinkle of sea salt on top of the bars before baking for a sweet and salty flavor contrast.
4. Experiment with different nut varieties such as almonds, walnuts, or pecans for a unique flavor profile.
Feel free to get creative in the kitchen and explore various combinations to make these Pistachio Dream Cookie Bars your signature dessert creation!
Serving Suggestions
These Pistachio Dream Cookie Bars are best enjoyed warm with a scoop of vanilla ice cream for a decadent dessert experience. You can also pair them with a hot cup of coffee or a glass of cold milk for a delightful snack any time of day.
For a special occasion, consider serving these bars alongside a selection of fresh fruits or a drizzle of caramel sauce for an elegant presentation that will impress your guests. The versatility of these cookie bars makes them a perfect choice for any dessert spread!
FAQs
Q: Can I freeze the Pistachio Dream Cookie Bars?
A: Yes, these bars freeze well. Simply wrap them tightly in plastic wrap and store them in an airtight container in the freezer for up to 2 months. Thaw them at room temperature before serving.
Q: Can I omit the nuts for nut allergies?
A: Absolutely! You can omit the pistachios and increase the amount of chocolate chips or add dried fruit for a nut-free version of these cookie bars.
Q: How long do these bars stay fresh?
A: When stored in an airtight container at room temperature, these Pistachio Dream Cookie Bars will stay fresh for up to a week. However, they are best enjoyed within the first few days for optimal taste and texture.
Final Thoughts
As you embark on your culinary journey with these Pistachio Dream Cookie Bars, remember that baking is not just about following a recipe—it’s about creating moments of joy and sharing love through delicious treats. Let the aroma of freshly baked cookies fill your kitchen and the taste of buttery pistachios delight your senses.
So, gather your ingredients, preheat your oven, and get ready to experience a taste of pure bliss with every bite of these heavenly Pistachio Dream Cookie Bars. Share this recipe with your loved ones, and create memories that will last a lifetime. Happy baking!
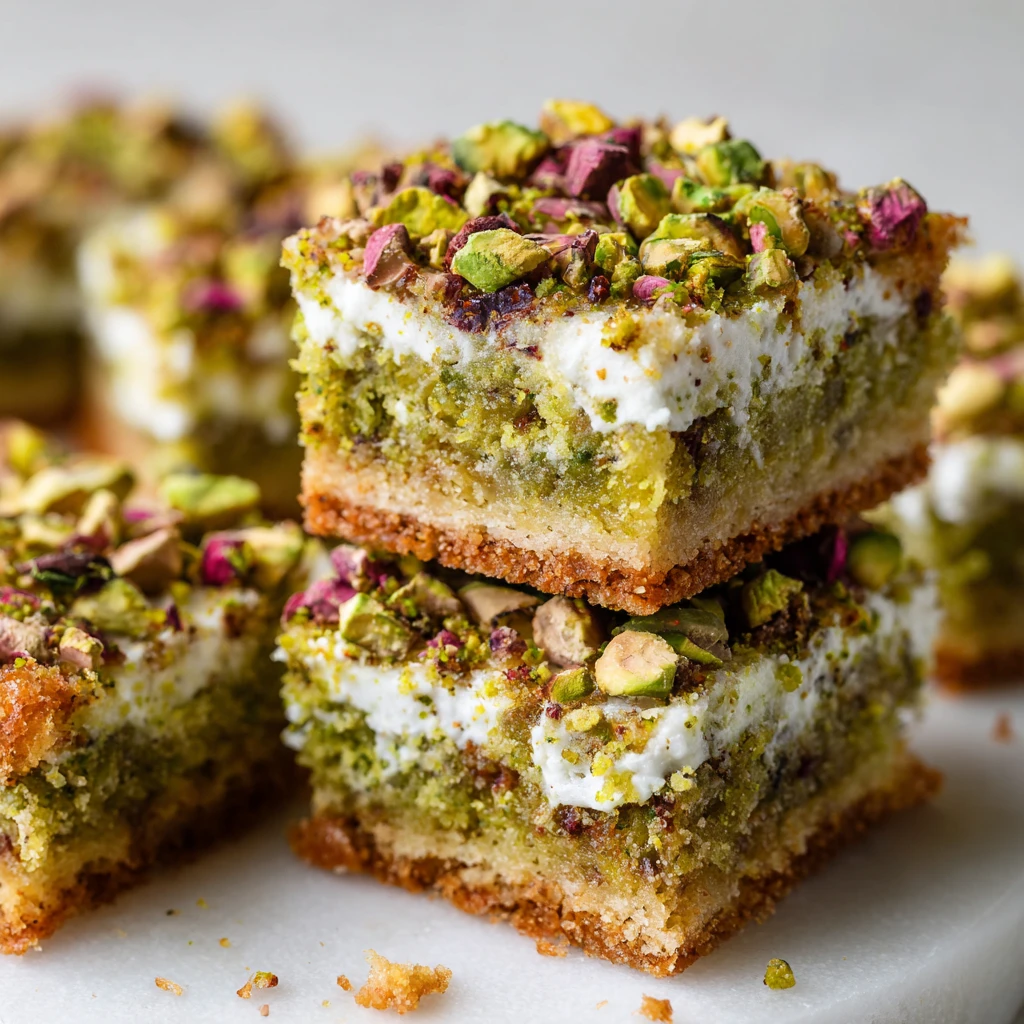
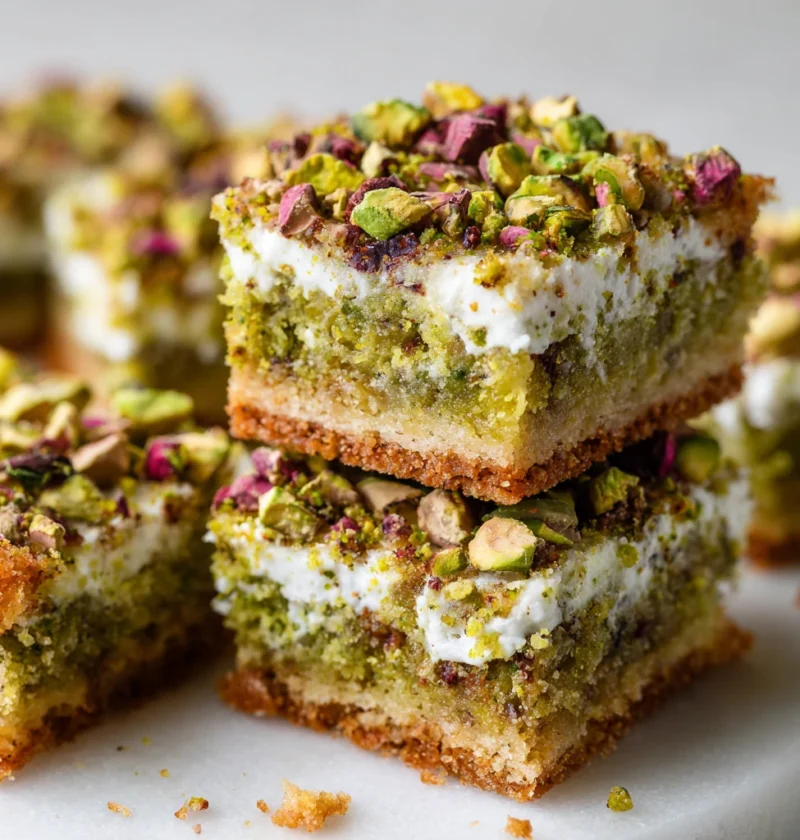
Pistachio Dream Cookie Bars Recipe
Indulge in the magic of chewy, nutty, and sweet dessert bars featuring a harmonious blend of pistachios, butter, and chocolate chips. These Pistachio Dream Cookie Bars are a delightful addition to any sweet celebration, offering a perfect balance of flavors and textures.
Ingredients
- 1 cup shelled pistachios, chopped
- 1 cup all-purpose flour
- 1/2 cup unsalted butter, softened
- 1/2 cup granulated sugar
- 1/2 cup chocolate chips
- 1 teaspoon vanilla extract
- 1/2 teaspoon salt
- 1/4 cup shredded coconut (optional)
Directions
-
Preheat your oven to 350°F (180°C) and line a baking dish with parchment paper.
-
In a mixing bowl, cream together the softened butter and sugar until light and fluffy.
-
Add the vanilla extract and salt to the butter mixture, and mix well.
-
Gradually incorporate the flour into the mixture until a dough forms.
-
Gently fold in the chopped pistachios, chocolate chips, and shredded coconut, if using.
-
Press the dough evenly into the prepared baking dish, smoothing the top with a spatula.
-
Bake the bars for 25-30 minutes or until the edges are golden brown.
-
Allow the bars to cool completely before slicing them into squares or rectangles.
-
For an extra indulgent touch, drizzle melted chocolate over the cooled cookie bars before serving.